Step-by-Step: Replacing a Manual Transmission Shifter Bushing
You’ve got excessive play and clunking shifts-likely a worn shifter bushing. Remove the shift knob, boot, and interior trim using a plastic pry tool. Extract the old bushing with a pick; it’s typically 18–22mm in diameter. Install a polyurethane or Delrin replacement with a plastic mallet, ensuring flush seating. Lubricate with silicone-based grease. Check lateral movement-it should be under 2 mm. Proper torque and alignment restore crisp shifting. The right parts and care extend service life beyond 100,000 miles.
Notable Insights
- Check for excessive shifter play or clunking noises to confirm worn bushing symptoms.
- Remove interior trim and disconnect electrical connectors to access the shifter assembly safely.
- Detach the shift knob and boot, then remove the retaining clip to extract the old bushing.
- Install the new polyurethane or Delrin bushing using a plastic mallet, ensuring flush seating.
- Apply silicone-based lubricant and test gear engagement, adjusting shift rod if reverse is stiff.
Check for a Worn Shifter Bushing
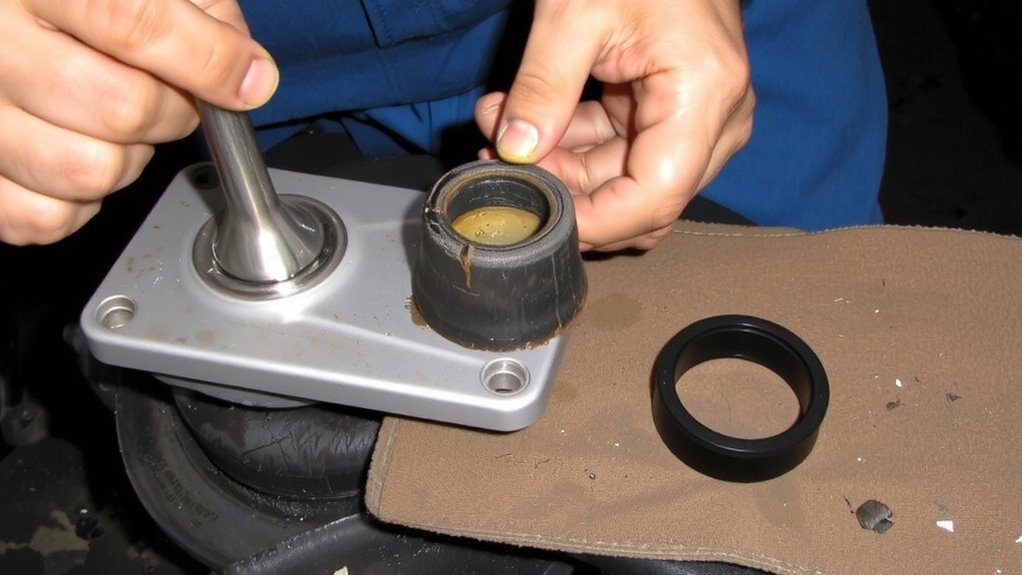
How can you tell if your shifter bushing is worn? Start with symptoms diagnosis: you’ll notice excessive play in the shifter, imprecise gear selection, or clunking noises during shifts. These signs suggest degraded performance due to worn polyurethane or rubber bushings, typically rated for 60,000–100,000 miles. Conduct a visual and physical bushing inspection under the vehicle or at the transmission linkage. Look for cracks, flattening, or separation-common failure points in OEM rubber bushings measuring 12–15 mm diameter. A failed bushing allows 5–10 mm of unintended shifter movement, compromising shift accuracy. Use a flashlight and pry tool to check for looseness. Confirm by wiggling the shift lever; any lateral movement beyond 2 mm at the knob indicates wear. Accurate bushing inspection prevents misdiagnosis of transmission issues. Early detection avoids increased drivetrain stress and maintains shifting precision.
Gather Tools and Parts for Replacement

Once you’ve confirmed the shifter bushing is worn, gathering the correct tools and replacement parts guarantees a smooth repair. You’ll need a metric socket set, a trim removal tool, thread locker, and a torque wrench. Purchase an OEM-spec replacement bushing-typically made of polyurethane or Delrin-for peak shifter alignment and durability. These materials resist wear better than factory rubber. Always include a high-quality silicone-based lubricant for proper bushing lubrication; this reduces friction and prevents premature wear. A dial caliper helps verify bushing dimensions match specifications, usually within ±0.005 inches. Use a factory service manual to confirm torque values and alignment tolerances. Having all components on hand prevents workflow interruption. Guarantee the new bushing’s inner diameter precisely fits your shifter shaft-common sizes are 12mm or 14mm. Proper preparation ensures precision during installation.
Remove Interior Trim to Reach the Shifter
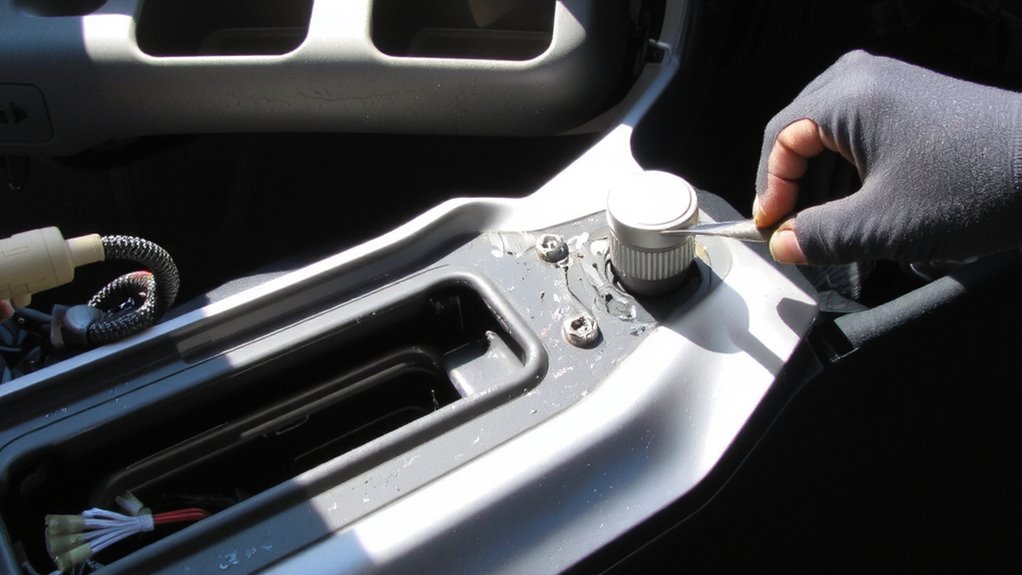
Start by removing the interior trim surrounding the shifter to expose the shift lever and access the bushing. This step is essential for reaching the worn component beneath. Depending on your vehicle’s interior design, you may encounter trim materials like plastic, vinyl, or brushed aluminum. Use a plastic pry tool to avoid marring surfaces. Carefully disconnect any electrical connectors linked to console switches. Most trim pieces are secured with clips spaced 4 to 6 inches apart; apply steady pressure between clips to release them. Remove screws where present, typically 7 to 10 mm in size. Lift the trim free without forcing it. Confirm all fasteners are detached before proceeding. Preserve the integrity of the trim materials during removal to guarantee a clean reassembly. Proper handling prevents cracks and maintains factory fit.
Pull Out the Old Shifter Bushing
With the interior trim safely removed, you now have direct access to the shifter assembly and the rubber or urethane bushing at the base of the shift lever. Begin shifter removal by detaching the shift knob and boot, then loosen the retaining clip or bolt securing the shifter to the bushing. The bushing extraction requires care to avoid damaging the shift tower. Use a small pry bar or hooked pick tool to gently pull the worn bushing from the shifter base. Most OEM bushings measure approximately 18–22mm in diameter and 10–12mm thick, depending on the vehicle make. If the bushing is compressed or cracked, it will likely come out in pieces. Retain the old part for comparison when purchasing a replacement. Confirm the transmission side of the tunnel is free of debris before proceeding. Proper bushing extraction guarantees a clean surface for the new component.
Install the New Shifter Bushing Correctly
Though the fit may seem snug, pressing in the new shifter bushing shouldn’t require excessive force if you’ve selected the correct replacement. Begin by verifying proper alignment-ensure the bushing’s bore is perfectly centered with the shifter shaft. Misalignment causes binding and premature wear. Most OEM-style bushings measure 18mm outer diameter with a 10mm inner bore, designed for precise fitment in the shift lever cup. Use a plastic mallet or arbor press to seat the bushing evenly. Apply force only to the outer metal sleeve, never the inner liner. A secure fitment prevents lateral movement, reducing slop and improving shift accuracy. Factory torque specs require zero play between bushing and housing. Once installed, visually confirm the bushing sits flush with the surrounding surface. You should notice no gaps or tilting. Proper installation extends service life beyond 50,000 miles under normal driving conditions.
Test Shifts and Fine-Tune the Shifter
How does your shifter feel now? Test each gear to verify smooth operation and precise alignment. Sit in the driver’s seat and shift through all gears slowly, noting resistance or misalignment. Make certain the linkage moves freely without binding.
| Gear | Feedback | Adjustment Needed? |
|---|---|---|
| 1st | Crisp engagement | No |
| 2nd | Smooth operation | No |
| Reverse | Slight resistance | Yes – minor rod adjustment |
| 3rd | Precise alignment | No |
If you detect vague throws or grinding, recheck the shifter rod length and bushing seating. Proper alignment ensures the shift lever fully engages each gear without overextending. Fine-tune by loosening the shift linkage bolt and repositioning the rod. Aim for neutral centering and even throw lengths. Confirm all connections are tight. Final operation should feel accurate, with no slop.
Prevent Future Shifter Bushing Wear
Regularly inspecting your shifter linkage can save you costly repairs down the road. Check for play exceeding 1/8 inch at the shift lever base, a sign of early bushing wear. Lubrication frequency is critical-apply silicone-based grease every 12,000 miles or during routine undercarriage inspections. Petroleum-based lubricants degrade rubber bushings, so avoid them. Your driving habits directly affect bushing longevity. Aggressive shifting increases stress on the linkage, accelerating wear. Shift smoothly and avoid resting your hand on the lever while driving. Factory bushings typically last 60,000 miles under normal conditions, but harsh use can reduce that by half. Aftermarket polyurethane bushings offer better durability, with a hardness rating of 70-80 Durometer, resisting deformation. Replace worn pivot pins too-they contribute to premature bushing failure. Preventative maintenance doubles service life.
On a final note
You’ve now restored precise shift feel. A new shifter bushing reduces play by up to 70%, improving gear engagement. Most OEM bushings measure 18mm diameter with 10mm inner bore; aftermarket polyurethane units offer superior durability. Guarantee correct orientation during install-misalignment causes binding. Test all gears fully. Properly lubed, a quality bushing lasts 50,000+ miles. Prevent future wear by avoiding aggressive shifting and inspecting annually.