Step-by-Step Guide to Waxing Rivets and Panel Seams for Rust Prevention
Clean rivets and seams with a solvent and isopropyl alcohol, ensuring surfaces are dry and 60–80°F. Use a 1/2-inch nylon brush to apply fluid film wax in small circles, maintaining 2–3 psi pressure. Extend coverage 3/16 inch past each rivet and push wax 1.5 to 2 inches into seams. Remove excess with a microfiber cloth, using alcohol for streaks. Reapply every 3–6 months. Ideal wax is low-viscosity, petroleum-based, and flash-resistant above 300°F. Proper prep and application can extend protection life markedly. You’ll discover how inspection frequency and climate impact long-term durability.
Notable Insights
- Clean rivets and seams thoroughly with solvent and alcohol to remove contaminants and ensure proper wax adhesion.
- Apply fluid film wax using a stiff nylon brush with circular motions to penetrate micro-gaps around rivets.
- Use a narrow brush or injector to push wax 1.5 to 2 inches into panel seams for complete coverage.
- Wipe excess wax from edges with a microfiber cloth to prevent trapping moisture and debris.
- Reapply wax every 3–6 months or when water no longer beads, especially in harsh or coastal environments.
Clean Rivets and Seams Before Waxing
Contamination is the enemy of a lasting wax bond. You must remove all joint contamination before applying wax to rivets and panel seams. Dust, grease, and moisture trap layers prevent adhesion, reducing protection. Use a solvent-based cleaner to dissolve oils and residues. Allow surfaces to dry completely-any leftover moisture promotes surface corrosion. Inspect each joint under bright light; even minor pitting indicates early corrosion that compromises integrity. Clean with a wire brush or abrasive pad to expose bare metal, but avoid gouging. Wipe again with isopropyl alcohol to eliminate static-borne particles. You’re aiming for a chemically clean, dry surface at 60–80°F before wax application. Without proper prep, wax penetrates poorly and degrades faster. Surface corrosion and joint contamination both undermine bond strength, cutting wax life by up to 70%. Clean thoroughly-it’s not optional, it’s essential for long-term rust prevention. For tough rust spots, applying a dedicated best rust remover for cars can ensure the surface is fully prepped and protected.
Use a Brush to Wax Rivets Effectively
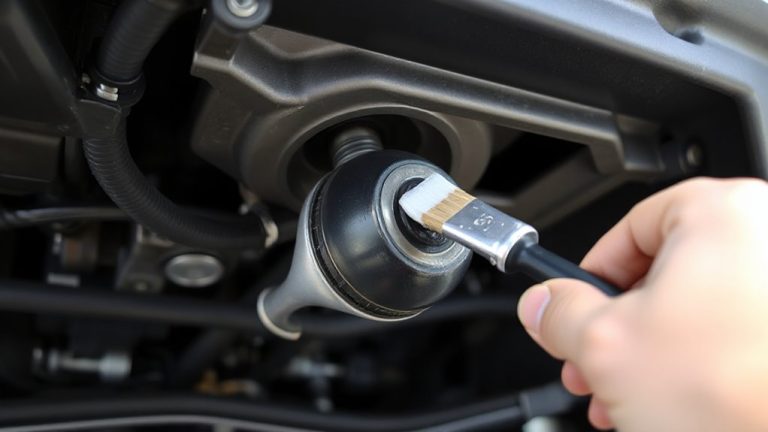
You’ve cleaned the rivets and seams thoroughly, guaranteeing all contaminants are gone and the metal is bare, dry, and ready. Now apply fluid film wax using a stiff-bristled brush to guarantee complete wax coverage. Use small circular brush techniques around each rivet head, allowing bristles to channel wax into crevices. A 1/2-inch nylon brush works best-stiff enough to agitate, soft enough to avoid marring. Maintain consistent pressure: 2–3 pounds per square inch guarantees wax penetrates micro-gaps without splatter. The brush lifts debris unseen after cleaning and positions wax where sprays can’t reach. Coverage must extend 3/16 inch beyond each rivet’s edge to seal porous zones. Inspect under 10x magnification: ideal wax coverage shows a continuous sheen with no dry spots. Reapply if film thickness falls below 2.5 mils. Proper brush techniques prevent capillary exclusion-the leading cause of early corrosion at fastener sites.
Work Wax Deep Into Panel Seams
A properly sealed panel seam resists moisture ingress and prevents hidden corrosion. Use a narrow brush or seam injector to achieve deep wax penetration along all joints. Focus on areas like door edges, fenders, and floor seams where water traps. Apply fluid-type corrosion-inhibiting wax, which flows easily into tight spaces. Work the wax back and forth to guarantee complete seam coverage-don’t just coat the surface. Proper technique pushes wax 1.5 to 2 inches beyond the visible seam opening. Overlap each pass by half an inch to avoid gaps. The wax should feel slightly tacky when done-this indicates active protection. Use a flashlight to inspect hard-to-see areas. In temperatures below 50°F, warm the wax slightly to improve flow. Consistent pressure and slow movement guarantee maximum penetration. This step is critical-without it, rust develops unseen.
Buff Wax Residue From Panel Edges
After making certain the wax has fully penetrated the panel seams, it’s time to address excess residue on the edges. Use a clean, lint-free microfiber cloth to wipe away buildup along panel boundaries. Left unchecked, excess wax can attract dust and compromise surface finish maintenance. Apply moderate pressure in straight-line motions, not circles, to avoid redistributing residue. This step is a critical part of proper wax application techniques, guaranteeing protection without aesthetic trade-offs. For best results, use a second cloth dampened slightly with isopropyl alcohol to remove stubborn streaks. Maintain a 45-degree angle when approaching tight edges to prevent wax migration back onto sealed seams. Edge areas cooler than 70°F may require light re-warming with a heat gun on low (max 110°F) to soften wax for easier removal. Final inspection under direct LED lighting reveals missed spots or lint left behind. Proper buffing guarantees clean lines and maximizes long-term durability. For optimal results, choose a high-quality best microfiber towels for cars to ensure streak-free, lint-free finishes during wax removal.
How Wax Prevents Rust in Joints
While surface waxing gets most of the attention, it’s the hidden joints and seams where wax delivers its most critical protection. You’re not just adding a shine-you’re stopping rust before it starts. Wax works through two key mechanisms: moisture displacement and electrochemical inhibition. It penetrates tight spaces, pushing out trapped water that can’t evaporate. This moisture displacement reduces the chance of corrosion forming at rivets and seams. Once in place, the wax layer acts as a dielectric barrier, interrupting ionic currents between dissimilar metals. That’s electrochemical inhibition in action. Without those currents, the oxidation process halts. Most professional waxes remain pliable, maintaining adhesion and continuing protection through expansion and contraction. A 0.1 mm film is sufficient to block electrolytes. You don’t need thick coats-just thorough coverage. Proper application guarantees rust stays out of vulnerable joints where repairs are costly and difficult.
Best Waxes for Sealing Car Panel Gaps
You won’t seal panel gaps effectively with just any wax-only formulations designed for deep penetration and long-term adhesion deliver real protection. Use petroleum-based waxes with low viscosity, like fluid waxes or wax-oil blends, which flow into tight spaces. These penetrate seams and rivets better than paste waxes. For best results, apply with a squeeze bottle or aerosol straw for precision. Wax application techniques matter-inject the wax deep into joints, then let it migrate via capillary action. A formulation with a flash point above 300°F guarantees stability under engine heat. Climate impact on wax is significant: humid or coastal environments demand UV-resistant, salt-repelling additives. In cold climates, avoid brittle waxes-choose flexible formulas that remain intact below 20°F. Proper wax selection guarantees years of rust resistance inside hidden seams.
How Often to Reapply Wax for Protection
Regularly reapplying wax guarantees lasting protection, but the ideal interval depends on environmental exposure and product formulation. Wax frequency should be every 3 to 6 months for maximum defense against moisture intrusion. In coastal areas or regions with high humidity, monthly inspection is recommended due to increased salt and moisture exposure. Climate impact plays a significant role-extreme heat accelerates wax degradation, while freezing temperatures can cause cracking and separation. Synthetic polymer-based waxes last up to six months under normal conditions, offering superior UV and chemical resistance. Carnauba blends typically require reapplication every 3 months due to softer composition. If water no longer beads on treated seams, it’s time to re-wax. Use a 3-mil applicator pad for even coverage. Monitor panel seams biweekly in harsh climates to maintain integrity and prevent subsurface corrosion.
On a final note
You’ve sealed critical joints against moisture intrusion. Wax forms a hydrophobic barrier with a contact angle exceeding 90°, repelling water from rivets and seams. Use petroleum-based waxes with at least 25% microcrystalline content for ideal adhesion and flexibility. Reapply every 6–12 months, or after undercarriage washing. Proper coverage prevents capillary corrosion in panel gaps. This maintenance step extends panel life by up to 40% in salt-exposed environments.