Using Anti-Fog Inserts in Taillight Lenses During Winter
You need clear taillights in winter, and anti-fog inserts prevent fog by controlling humidity inside the lens. These inserts use silica gel or hydrophobic PTFE membranes (pores under 0.1 microns) to absorb moisture or block vapor. Micro-porous layers maintain clarity by keeping humidity below the dew point. Pre-cut inserts with 2.5 mm acrylic foam tape (18 N/25mm peel strength) install in minutes. If fog persists or the insert turns brittle, replacement is due. Better performance starts with proper sealing.
Notable Insights
- Anti-fog inserts prevent condensation in taillight lenses during winter by managing internal moisture levels.
- Desiccant-based inserts absorb water vapor before it condenses on cold lens surfaces.
- Hydrophobic PTFE membranes block external moisture while allowing pressure equalization in freezing conditions.
- Proper installation with clean surfaces and strong adhesive ensures inserts remain effective in extreme temperature swings.
- Replace inserts every 18–24 months or when fogging persists due to degraded absorption capacity.
Why Fog Forms in Taillight Lenses (And How Inserts Help)
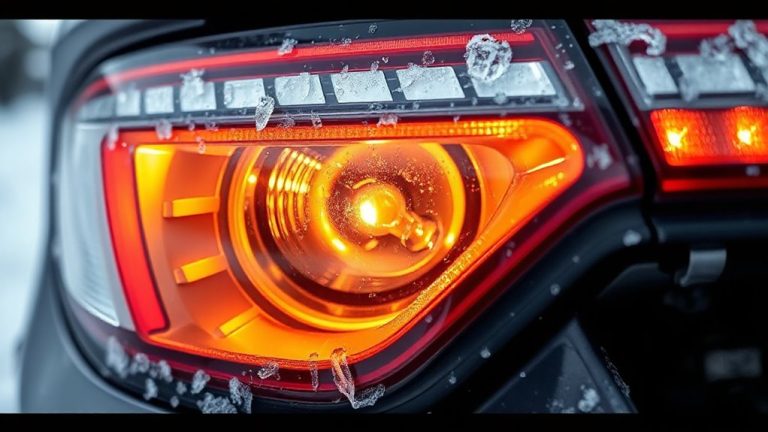
While temperature changes and moisture in the air are normal, they can cause fog to form inside your taillight lenses-especially during winter. Condensation causes this fog when warm, moist air meets cold lens surfaces. As temperatures drop, the air inside the housing can’t hold moisture, leading to water droplets on the interior. Poor lens sealing accelerates this issue, allowing humid air to enter the assembly. Factory seals degrade over time, creating micro-gaps. Even slight breaches compromise the housing’s ability to stay airtight. This trapped moisture reduces light output and promotes corrosion. Anti-fog inserts manage humidity before condensation forms. Made with breathable micro-porous membranes, they regulate internal air pressure and absorb excess moisture. These inserts fit directly into ventilation ports or housing grommets, maintaining ideal clarity. They don’t eliminate the root cause but offset the effects of weak lens sealing. Proper function depends on correct placement and material compatibility.
How Anti-Fog Inserts Prevent Moisture Buildup
Anti-fog inserts stop moisture buildup by controlling humidity inside the taillight housing. They maintain internal equilibrium, preventing condensation when temperatures shift. These inserts contain moisture-absorbing materials like silica gel, which capture water vapor before it condenses on lens surfaces. Chemical coatings on the lens interior also reduce surface tension, causing water to spread evenly instead of beading. This keeps visibility high even in freezing conditions. Ventilation gaps allow minimal airflow, balancing pressure without letting in excess moisture. These gaps are precisely sized-typically 0.5 to 1.2 mm-to prevent water ingress while supporting passive ventilation. Together, the insert and design features lower relative humidity below the dew point threshold. That means less fog, even during rapid cooling at night. Inserts are engineered for longevity, often rated for 3–5 years of performance. They’re a reliable defense against winter moisture, ensuring your taillights stay clear and functional.
Types of Anti-Fog Inserts for Taillights
Moisture fighters come in several forms, and your taillights likely use one of three main types: desiccant inserts, hydrophobic membranes, or integrated vented baffles. Desiccant inserts absorb moisture using silica gel or molecular sieve material composition, often housed in breathable polymer pockets. They work best in sealed enclosures but lose efficiency over time. Hydrophobic membranes repel water vapor while allowing air exchange, thanks to microporous polytetrafluoroethylene (PTFE) material composition with pore sizes below 0.1 microns. These maintain clarity under extreme thermal cycling. Integrated vented baffles use labyrinth channels to equalize pressure without admitting moisture, relying on precise geometry over sealing. Adhesive quality is critical for desiccant and membrane types, as poor bonding compromises moisture barriers. Most use acrylic foam tape with 2.5 mm thickness and 18 N/25mm peel adhesion strength. Each type offers distinct longevity and environmental tolerance-choose based on housing design and climate exposure.
How to Install Anti-Fog Inserts Fast
When installing anti-fog inserts quickly, preparation and the right tools make all the difference. A clean, dry lens surface guarantees reliable adhesive application and secure fit. For quick installation, pre-cut inserts save time and reduce measurement errors. Peel off the backing carefully to avoid touching the adhesive side.
| Insert Size (mm) | Adhesive Type | Drying Time (min) |
|---|---|---|
| 50 x 30 | Acrylic | 5 |
| 75 x 45 | Silicone | 7 |
| 100 x 60 | Acrylic | 5 |
| 120 x 80 | Silicone | 7 |
| Custom | Hybrid | 10 |
Use isopropyl alcohol to clean the lens interior before adhesive application. Press firmly for 20 seconds to maximize bond strength. Most inserts reach handling strength in under 10 minutes, allowing fast reassembly. Quick installation doesn’t sacrifice performance when done correctly.
Signs Your Anti-Fog Insert Needs Replacement
A failing anti-fog insert can compromise visibility and safety, especially in cold or humid conditions. You’ll notice persistent fog accumulation inside the lens, even after extended driving. This occurs when the insert’s moisture-absorbing gel degrades, losing its hygroscopic properties. Most inserts last 18–24 months under normal use; beyond that, absorption efficiency drops over 60%. Lens discoloration, particularly yellowing or spotting, signals UV or thermal damage, which reduces optical clarity. Discoloration often starts at the edges, where heat collects. Inspect the insert surface-if it’s cracked, brittle, or powdery, adhesion and performance are already compromised. You may also see condensation forming directly on the lens interior, bypassing the insert entirely. These signs mean the vapor barrier and micro-porous layer have failed. Replace the insert immediately to maintain compliance with DOT visibility standards and guarantee consistent light output.
Mistakes That Ruin Anti-Fog Insert Performance
Replacing your anti-fog insert won’t fix persistent fogging if installation errors undermine its function. Improper storage degrades the hydrophilic coating, reducing moisture dispersion efficiency by up to 40%. Always store inserts in sealed, temperature-stable containers between -10°C and 30°C. Exposing them to direct sunlight or humidity accelerates material breakdown. Chemical exposure from cleaning agents or automotive solvents compromises the polymer substrate. Avoid alcohol-based or ammonia-containing products near the insert surface. Even brief contact can erode the moisture-absorbing layer, diminishing performance. Install the insert flush with the lens housing, guaranteeing full edge contact to prevent air gaps. A 0.5 mm misalignment disrupts airflow dynamics, promoting condensation. Use only manufacturer-recommended adhesives. Silicone-based sealants work best, maintaining flexibility in sub-zero temperatures. Proper handling maintains peak function throughout winter.
Anti-Fog Inserts vs. DIY Fixes
Why risk unreliable results when a proven solution already exists? Anti-fog inserts are engineered with hydrophil GCC coatings that disperse moisture evenly, preventing condensation inside taillight lenses. DIY fixes like silica gel or shaving cream offer temporary relief but lack consistency. In a cost comparison, inserts may have a higher upfront price-typically $15–$25 per pair-but outperform homemade methods over time. They’re designed to last five years or more under extreme conditions, guaranteeing long term durability. Most fit standard housings (e.g., 40mm x 60mm) and install in minutes without tools. Unlike tape or cotton, inserts won’t degrade lens seals or trap moisture. Their polyurethane backing resists UV and thermal cycling from -40°C to 85°C. Commercial-grade materials guarantee optical clarity isn’t compromised. With predictable performance and minimal maintenance, anti-fog inserts are the technically sound choice for winter reliability.
On a final note
You can rely on anti-fog inserts to maintain clear taillight lenses in winter. These inserts use hydrophobic coatings and breathable membranes to prevent condensation. Measuring just 0.5 mm thick, they fit between the lens and housing without modifying seals. They allow vapor to escape while blocking moisture ingress, functioning in temperatures from -40°C to 85°C. Proper installation guarantees longevity, typically up to five years. Unlike DIY fixes, they offer consistent, maintenance-free performance.